Sunday, October 18, 2009

Bead and Cove Strips


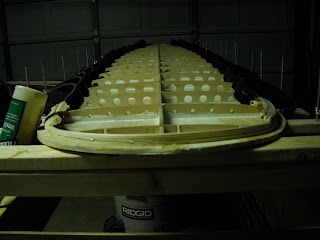
After a nearly three month respite, I'm back to building the Waterlog. When I left off, I had just completed adhering the chine log and one or two of the bead and cove strips. I've since glued about six or seven additional bead and cove strips and it's starting to look more like a surfboard. The PVC clamps come into their own just as the 2" clamps can longer get around the strips.

All was going well until I noticed that there are about three frames on the left hand side where the bead and cove strips are not quite in contact with the frames. There is probably a 1/16" gap at the middle frame, but less on the two contiguous frames. This is the case with only about two bead and cove strips, then there is continuous contact with all them. I'm concerned that section of the rail will not be "fair," which the directions ominously warn not to let happen. It did, and now I'm going to have to deal with it. I thought squeezing that section of the rail closer to the frames might work. I was able to squeeze it closer; unfortunately, I stressed the entire section of the rail doing so. Later, when I was wiggling the next bead and cove strip on that section of the rail, twelve inches of the rail lifted off the starter rail. Oops. I quickly re-glued that section and clamped it down. I'm going to have to try some other solution. Maybe sanding it "fair" when I'm shaping the rails will work. In the meantime, I'm wondering if I should reinforce that section from the interior sided of the rail. Perhaps with some addition Tite Bound.

I desperately need to pick up the pace of this project, as the leaves are falling and the temperatures are beginning to drop. I doubt that I should be glassing the board in the garage when it gets too cold. It has also been made clear that the cars get first priority in the garage as soon as the first snow arrives. Besides, I want to start surfing on this new water craft.

Above are a few pictures of the Waterlog as the bead and cove rails are being adhered. Sorry, no images of the rail section separating from the board.

Quick update...I emailed Mike L, explaining the gap issue and here's his response: If there are gaps, but you're already well above those points with your railing, just mix up some thickened epoxy with sawdust and smear it in the those areas on either side of the frame(s). The will just support the strips and keep the board a little stronger in those areas. If you are still railing, and some of the frames are pulled away enough where it is hard to keep the shape with the rail strips, you might cut some little shims from scrap cedar to push into the gap. This will give the strips something to land on i those areas. Little by little, you want to come back to the frames so that the get gap gets progressively smaller. This is the best way to keep the rail shape as true as possible.

I'm going to use the epoxy and saw dust solution, as the gaps aren't very large. Within two bead and cove strips, they're laying nicely on the frames again. I don't think this will be a huge issue in the long run.

Saturday, July 25, 2009

Chine log and starter rail

After a one month hiatus, I finally glued the chine log and starter rail to the board. Not much to report here other than steaming each in order to bend them around the nose was easier than I thought. The cedar becomes very pliable after just a short time under steam. 

Next step will be to start building up the rails. 

Sunday, June 28, 2009

The 3M 5200 Has Finally Dried

I heard back from Mike at Grain, and he suggested to just let the adhesive cure. It turns out, I over looked the 3m 5200 fast cure that was packed with the kit. Lesson learned, inventory everything before beginning the project. 

Anyway, the adhesive has finally cured and the board looks good. I'm ready to prepare the board for the chine log and bead and cove strips. 

Saturday, June 13, 2009

Is the Frame Glued to the Panel?

Well, I let the 3M 5200 adhesive cure for a week and it's still a little tacky. I used the wrong 3M 5200 adhesive, not the fast cure, as the instructions indicate. I'm not sure what to do at this point, so I emailed Mike and Brad at Grain to get their feedback. I'll wait to see what they suggest to remedy this issue.

Sunday, June 7, 2009

Frame Glued to Panel


Today I glued the internal frame to the bottom panel. Before I began the gluing, I had to prepare the keel and frames. After gluing the keel together, I noticed that the keel was not perfectly straight. I was concerned that it would not adhere to the panel in a true fashion. To ensure that it would be glued true, I cut several small pieces of the marine plywood that the frames and keel were cut from and lined them along the center of the board. I temporarily glued them there with Elmer's glue. I did this in about eight locations along the center of the panel and it kept the keel quite straight. These stays can be seen in the top three images.

The frames, or ribs, fit quite loosely on the keel. After fitting the frames on the keel, I found that whenever I lifted the keel, several frames would fall out. Furthermore, the first frame (closest to the nose of the board) did not fit at all. I gingerly sanded the slots on the frame and keel so they would fit better. While I was doing this, the nose of the keel snapped off right where the slot for the first frame is located. Ouch! I glued it with Titebond III, clamped it, and said a few prayers. After two days, I removed the clamps and it appeared that my prayers were answered. I still had to sand the slot on both the frame and keel to make sufficient room for the two to fit properly. I pushed my luck and the nose snapped again while sanding. This time I said #@%$ ! I glued it again and said some more prayers. Finally learning from my previous mistake, I sanded only the frame and then glued it to the keel. I didn't glue any of the other frames.

Everything seemed to be in order to glue the keel and frames to the panel. I sought the assistance of my beautiful and patient partner, Vanessa, and our lovely daughter, Malia. I smeared the 3M 5200 marine adhesive all over the keel and frames, while Vanessa looked on ready to help me place the gluey mess on the panel. Meanwhile, Malia snapped about fifty pictures of the process. She took all photos for this entry while rollerblading around us to get the best action shots.

Once we laid the keel and frames to the panel, we started locking down the stays on the rocker table. This took a bit of time. We started from the center and worked our way out to the nose and tail. We proceeded slowly as we began to crank down the stays. We tightened both the top and bottom stays. We tightened the bottom stays because that was the only way we could get the outside of the frames to make contact with the panel. Once all the stays were tightened, I applied more 5200 and "filleted" it along both sides of the keel and each of the frames. I think it looks like it should but I won't know if I/we did it correctly until I release the stays and everything remains in place. I'm going to let the 5200 set for the week.

One observation I would like to share is this process is very messy. I had 5200 on everything and probably went through a roll of paper towel trying to keep the ubiquitous white stuff from getting the best of me.

A quick update, I bought 3M 5200 marine adhesive to adhere the keel and frame to the panel. Make sure you get the fast drying 5200. It's been three days since I glued everything and it's still tacky. I might be waiting more than a week for this stuff to cure.

Monday, June 1, 2009

Panels Glued


Okay, I've glued the panels together and the process was fairly straightforward and simple. The only issue I had was warping. The two center boards for the bottom panel of the board were significantly warped. The manual that accompanies the board said to expect warping up to a quarter inch. The two center boards were warped about three quarters of an inch. This could be the result of the arid environmental conditions in which I live (high desert). To accommodate this warping, I glued the two center boards separately, and then glued the remaining boards to to those. I seemed to work just fine. Time will tell if this was prudent. The only other issue I encountered was making sure all the boards were glued evenly. This was like herding cats at night. The boards are ten feet long and as soon as I was able to get two or three boards lined up, it seemed as though another one was out of line. Eventually I got them lined up as best I could and let the glue dry. (BTW - Titebond III sets up pretty quickly).

I think the grain pattern on the panels will be distinctive. There are numerous book-matched knots that will probably look really good once the board is glassed. Some of the knots were holes, but I filled them with Titebond, as instructed. I hope that won't affect the strength of the panel once it's glued to the frame. The knots are covered with the small pieces of blue tape in the images above.

After letting the panels set, I lightly planed and sanded the interior side of the bottom panel to even the surface in preparation for gluing the frame to the panel.

Monday, May 18, 2009

The Kit Has Arrived


Okay, my Waterlog kit has arrived and I unpacked it. It looks like a very large rubberband powered balsa wood airplane. I haven't done anything other than read the instructions and start to build the rocker table. I've invested quite a bit of time and money in constructing this piece of equipment. The process is simple enough. First build a really large rectangle - 10 feet by 2 feet by 6 inches. Then add some rungs - fifteen of them for the Waterlog. Next, add some threaded rods that will allow you to adjust the height of the rungs to match the curviture (rocker) of the frame. I built a rocker table that is far more elaborate than the manual suggests, because I enjoy making simple tasks unnecessarily complex.

Note my growing collection of clamps that will soon be added to the pell-mell decor of our garage in the near future.

The next step will be gluing the panels. Sounds simple, which is a good indication that it's not.

Tuesday, April 28, 2009

Grain Waterlog Surfboard - First Post

A couple of years ago, I was given a copy of Tom Blake: An Uncommon Journey of a Waterman. This book chronicles the life of an amazing man who loved to surf, swim, and save lives (a gross over simplification). Blake, along with his idol, Duke Kahanamoku, was instrumental in popularizing surfing during the early twentieth century. Perhaps Blake's greatest contributions to the sport of surfing were his many innovations related to surfboard design. He is credited with being the first person to build a hollow wooden surfboard and adding a fin to the surfboard for stability. So revolutionary was his hollow wooden surfboard design that he applied for and was granted a patent for the plans. The hollow wooden boards were originally used for surfing, paddle boarding and as life saving vessels.

I was intrigued by Blake's hollow wooden surfboard design. So much so that I thought I would attempt to build a replica. I began researching hollow wooden surfboards and discovered a small company in Portland, Maine that sells both hollow wooden surfboards and hollow wooden surfboard kits. The company is Grain Surfboards and they appear to be carving out a niche in the surfboard industry, capitalizing on the fundamental tenets of Blake's design and a more environmentally friendly approach to building boards. Initially I was going to build a Blake hollow wooden surfboard replica as a fun project that would probably never leave my house nor see that water. After discovering Grain Surfboards kits, however, I thought that this would be a great way to pay homage to Blake's design while making something that I could surf. I also considered Paul Jensen's kits. I really like his designs, building process and the spirit in which he makes boards. I just felt that my lack of woodworking skills, equipment and limited access to the necessary supplies would make the experience frustrating. I plan on building one of his designs after I complete this first board.

I decided to purchase Grain's Waterlog kit because it most closely resembles my favorite surfboard - a Hap Jacobs Classic. My Hap Jacobs is 9'10" long, 23 inches wide, and almost three inches thick. This board was shaped by Hap and is the board I've most enjoyed riding over the years. It's my magic carpet. I've had it for about twelve years and would like to use it a little less than I do to help prolong its life. The Waterlog is ten feet long, 23 inches wide and three inches thick.

I gleaned quite a bit information about the process of building these kits through others who have purchased Grain Surfboards kits and shared their building experiences through blogs. For better or worse, I'm adding to that growing body of blogs in the hope that my experiences will be of some value to others interested in a similar project. As an aside, I've culled an enormous amount of information from the Swaylocks website. For anyone who isn't aware of this site, stop reading this blog and visit Swaylocks immediately. I consider Swaylocks to be one of the most informative sites for surfboard design and construction. There are innumerable talented and creative people sharing their projects, ideas, and experiences. I lurk on the site but am deeply appreciative to all those who post. Another great resource is the Tree to Sea website, started by Rich Blundell who is one of the co-founders of Grain Surfboards.

I ordered the Waterlog kit three weeks ago while Grain was having its hibernation sale (there was a slight discount on the price of the kit). The kits are not inexpensive, but the folks from Grain include everything you will need to build the board, which was a significant selling point for me because I live in a rural area that is several hundred miles from the Pacific coast. Living so far from the ocean, I don't have ready access to many of the key components needed to build a board. I'm eagerly awaiting the arrival of the kit and plan on posting regular updates on my progress.